
Last weekend 9 of us nerds gathered at the Morris
Nerdatorium (Greg’s basement) and brought 2500 pts each for a knock down, drag
out, smash-em-up, Apocalypse battle.
I, Jordan, was the game master and if you want to know the
story line then check out the previous Apocalypse 2: Tauriffic Boogaloo posts.
ONTO THE BATTLE REPORT!
The Tau/Eldar had to deploy first and started with 2
Fortress of Redemption buildings, as these were the main objectives, worth 1 VP
per section held at the end of the game.
The crates that littered the centre of the table were worth 1VP, which
was tallied just before each break.
These points could be spent on Strategic Resources and Strategic Reserves.
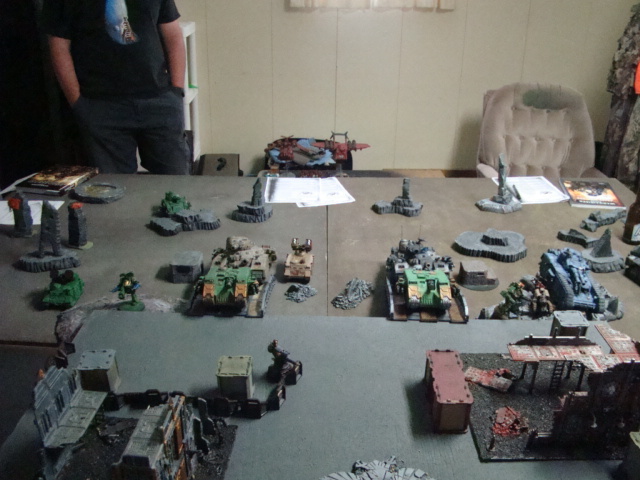
DEPLOYMENT
Since the Tau and Eldar were the defending side they
deployed first. Their deployment zone
will be the North part of the board, for ease of describing where everything
is. In their deployment zone they have
both Fortress of Redemptions and at least 6 crates. Wes took the Initiative and deployed a good
size of his force right up front with the intent of taking control of some
of the crates early on to earn some VPs,
the rest of his army went in the eastern Fortress. Chad deployed some of his forces on the
battlements of the western Fortress and joined Wes with a smaller force taking
the crates. Mike deploys a minimal force
near the western Fortress. Sean deploys
his Titan behind the western Fortress using the tower to gain a cover save from
most of the table, some grav tanks on the edge in the middle, and his Farseer
formation in the east Fortress tower.
There were several Crisis suits, a couple Riptides, and 2 Tigersharks in
reserve.


The Imperials, being the attackers, deployed second but
would be receiving the first turn. In
their deployment zone they had some rocks

That didn’t stop them though, the forces they deployed were
right on the line ready to move forward.
Greg and JP deployed Land Raiders on the bridges, providing some cover
to the Baneblades right behind them.
Charles had a couple mini-super heavies and a regular super heavy on the
table and Steve had next to nothing.
TURN 1
So it turns out that the Imperial players took this whole
invading strike force thing seriously as they had almost half of their points
poised to deep strike but not before playing their assets that allow them to
deep strike without scatter and naming Longstrike as the warlord worth 3VPs...uh
oh.


So that’s a look at what the table looks like after the
reserves come in and the Tau take a pounding.
Particularly poor, poor Wes who loses half of his army when the
Imperials drop, but like a champ, holds onto the Fortress of Redemption he has
occupied.
 |
| There were a bunch of Kroot there |
The cavalry arrives with the Tigersharks coming in from the
north west table edge and a handful of crisis suits, along with several Eldar
deep strikers. The retaliation is
fierce, but somewhat ineffective despite removing an entire unit of assault
marines with a Tau bombardment.


At this point we have been playing for 2 hours and it’s break time. The score is: Imperials 6, Taudar 1
TURN 2
Thanks to the spanking they received in turn 1, the Tau are
able to activate their Devine Intervention which gives them all Stubborn and
Feel No Pain (4+). However the pain does
continue. Much to Wes’ chagrin, the
eastern Fortress of Redemption comes under siege from both Charles and
Steve. Combined flaming and assaulting
the hatches puts a hurt on the units inside but they manage to hold on. The Blood Angels Librarian on the west side
scare the Broadsides and they run off the table and one of the Tigersharks is
shot down. The imperials, considering
they are up by 5 points decide that they are safe for now and spend a point to
get their Praetor tank back in reserve, they will need it to take out the
Tigersharks.


The Tau take this opportunity to spend a VP to get their
Tigershark back and put it in reserves, a risky move considering they are so
far down in points. However, the Taudar
fight back valiantly and manage to put a smack down on the Imperials killing
many marines, the Macharius mini-super-heavy and the Baneblade super heavy.


After 4 hours of gaming we have completed 2 turns, not quite
the pace that was set in the previous Apocalypse game run by Greg, but lots of
shit is dying so it’s fun all around, and the score is 11-6 (or somewhere around
there) for the Imperials. We break for
meat and Greg, once again, does a wonderful job of BBQing up our steaks, or
half a cow in JP’s case. After a quick walk for some snacks for later, and I snap
this pic of an awesome swing

It’s time to get back to the game. Now it’s 6:30, so it’s pretty clear that
unless things get moving we are only getting one more turn in, but It’s a
doozy.
TURN 3
You might be thinking, Greg had all kinds of cool rules in
his game. Big balls of falling poo,
prisoners in pens, etc. etc. Well, I did
too, I guess I just didn’t make it quite so obvious as to how they would get
these rules into play, but it all comes together this turn, by accident.
This turn starts off with JP calling his Finest Hour. His warlord, Vulcan now has strength 10
attacks that have the Concussive and Strikedown abilities. Vulcan calmly exits his pimped out ride, a
Cestus assault vehicle and strides up to the Eldar Titan.
Elsewhere, shooting is happening and lots of shit dies. The crowning achievement though is when a
Hellhammer shot deviates a little and hits one of the large objective
crates. I had mentioned that the crates
can be destroyed and count as AV14 immobile vehicles. No one had been shooting them though because
they are objectives. Still, I thought
one or 2 would get shot at to prevent the opponent from scoring those
points. Nevertheless, one of the larger
crates blows up and sets off the Magma storm unnatural disaster. The larger crates set off the Flaming
Boulders result, and the smaller crate would set off the Rain of Lava result,
which we will get to. The way I resolved
who was going to be hit was to start with the closest unit then move outwards
until all the flaming boulders were resolved.
Well I just so happened to roll 6 flaming boulders, which are S10 AP2
large blast. The result was several
things dead AND 2 more crates were busted open, a small one and another large
one which sends 5 more flaming boulders into the air. The small one killed several heavy weapons
marines on the South East corner of the central board, and the large one
manages to blow up A FOURTH CRATE which in turn kills s couple of things around
it.
So, one deviated Hellhammer shell detonates 4 crates, kills
over a dozen models, smashes the Cestus to the ground, and inflicts a hull
point on the Eldar titan. It’s too bad
this happens in the late stages of the game because if 1 more crate would have
exploded then the Airborne Inferno result would have been activated for the
rest of the game.
Ok, that was the shooting phase, NOW back to VULCAN!


Remember that he called his finest hour which
makes him strength 10 in combat right, and he got out right in front of the
Eldar Titan right? Well, that crazy son
of a bitch assaults the titan. With his
5 attacks, he manages to inflict an amazing 8 hull points worth of damage and
kills the titan. As Vulcan turns to walk
away from the wreckage, cause cool guys don’t look at explosions, the titan
erupts in an explosion the intensity of a small supernova and Vulcan is
incinerated. Oh well, you can’t win them
all.
The Taudar turn is a bit of a scramble. With the titan gone, along with most of their
army they are struggling to score points.
In a desperate attempt for those points, Mike attempts his secret
mission, which is to kill the Eldar Warlord, Eldrad. In writing this objective, I was kind of
hoping that Mike might take it a little more personal and try to snipe out
Eldrad, who was in an unkillable unit of Farseers, who were forced to jump off
the top of the Fortress of Redemption tower.
However, Mike tried to pull off the old “oops didn’t see you there”
bombardment. Unfortunately the
bombardment was off target and it smashed into the Fortress’s bunker that
happened to be occupied by Wes’ troops.
The bunker was destroyed along with the models inside and the Eldar were
unscathed.

It was at this point that the players recognized the
potential devastation of the crates, combined with their desperation, and
several shots were wasted trying to shoot a large one near several Imperial
units. In retrospect, perhaps I made
them a little too strong to kill which made the idea less inviting. Who wants to waste a lascannon shot to kill
an objective when it could kill the model on the objective?
In the end the score was:

Charles scored 2 bonus points with his secret objective by
killing the most expensive unit in Mike’s army with one of his units that had
the Red Thirst, despite the beating he took, Wes still had a unit of 6
Firewarriors inside a section of the Fortress, the Hellhammer was the only superheavy to
survive the whole game, and Sean scored 2 bonus points for killing the Imperial
Warmaster (Vulcan) and stopping his Finest Hour.
All in all it was a great day, and everyone had fun. At least that’s what they told me. Looking forward to the next one which, as I
understand, will be run by Wes. Check
the forums for details.
Awesome post! It was sooo much fun. AND LOOK AT ALL THE GREEN!!!!!
ReplyDelete(ps. Darkstrider was Wes's HQ, not Longstrike)
It was a great game and a great day.
ReplyDeleteThanks Jordan and Greg.